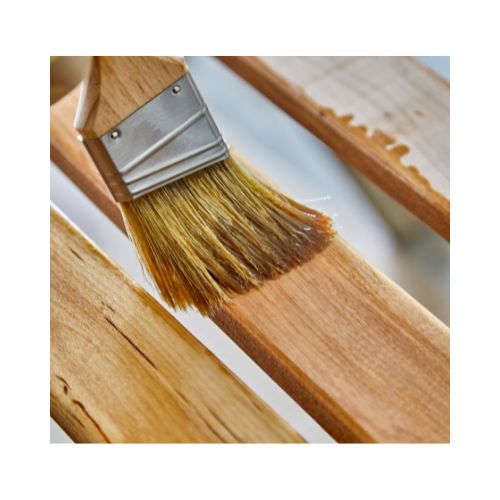
Are you ready to give your deck a fresh new look? Learning how to prep a deck for staining is crucial to achieving a beautiful, long-lasting finish. A well-prepared deck is the most important step in getting the results you desire that will last for years to come. With the right approach, you can transform your weathered deck into a stunning centerpiece of your backyard.
In this guide, we'll walk you through the essential steps to prepare your deck for staining. You'll learn about gathering the necessary cleaning products, making deck repairs, and the importance of cleaning your deck before staining. We'll cover everything from deck cleaning and staining techniques to using wood brighteners and other deck stain prep methods. By following these tips, you'll be well-equipped to tackle your deck preparation project with confidence, ensuring a professional-looking result that will make your neighbors envious.
Gather Necessary Tools and Materials
Before you start prepping your deck for staining, it's crucial to gather all the necessary tools and materials. This step ensures that you have everything you need at hand, making the process smoother and more efficient. Let's break down the essentials into three categories: cleaning supplies, safety equipment, and repair materials.
Cleaning Supplies
To get your deck ready for staining, you'll need:
- Pressure washer: This is an effective tool for thorough cleaning. Use a fan-type nozzle to avoid damaging the wood. If you don't have a pressure washer you can always opt for the elbow grease method. It requires more work and doesn't get as deeply clean but will still get you adequate results.
- Stiff-bristle brush: For scrubbing stubborn grime and mildew.
- Deck cleaner: Choose a product suitable for your deck's wood type.
- Garden hose: For rinsing the deck after cleaning.
- Pump-style sprayer: Useful for applying cleaning solutions evenly.
- Large bucket: For mixing cleaning solutions.
- Tarp: To protect surrounding vegetation during the cleaning process.
Safety Equipment
Your safety is paramount when prepping and staining your deck. Make sure you have:
- Gloves: To protect your hands from chemicals and splinters.
- Safety goggles: To shield your eyes from splashes and debris.
- Dust mask or respirator: To prevent inhalation of dust and fumes.
- Long-sleeved clothing: To protect your skin from chemicals and sun exposure.
Remember, always work in a well-ventilated area. If you're in a semi-enclosed space, set up fans to move vapors away from your workspace.
Repair Materials
To address any damage your deck may have before staining, you'll need:
- Pry bar and hammer: For removing damaged boards.
- Circular saw: To cut replacement boards to size.
- Drill and screws: For securing new boards.
- Sandpaper (120-150 grit): For smoothing rough spots.
- Pole sander and hand sander: For larger areas and detailed work.
It's worth noting that fillers generally don't work well on decks due to the wood's expansion and contraction with humidity changes. For significant cracks or voids, it's often better to replace the board entirely.
Additional Tools:
- Roller and roller tray or stain pad with pole: For applying the stain.
- Stain brushes: Use natural bristle brushes for alkyd oil stains and synthetic bristles for acrylic products.
- Stirring sticks: For mixing the stain thoroughly.
By gathering these tools and materials beforehand, you'll be well-prepared to tackle your deck prep project efficiently and safely. Remember, the key to a successful staining job lies in thorough preparation, so don't skimp on this crucial step. With the right tools at your disposal, you'll be ready to transform your weathered deck into a beautiful outdoor living space.
Inspect and Make Repairs
Before you start prepping your deck for staining, it's crucial to inspect it thoroughly and make necessary repairs. This step ensures that your deck is structurally sound and ready for the staining process.
Identify Problem Areas
To begin, carefully examine your deck for signs of damage or wear. Look for:
- Splintered wood
- Broken planks or drooping sections
- Detached or unsecured railings
- Loose nails
- Loose stair steps
- Moldy or rotted spots (may feel soft or spongy)
- Missing or corroded metal connectors beneath the decking floor
Pay close attention to any areas that look out of place, even if they don't seem serious. Addressing these issues promptly can prevent more significant problems down the line.
To check for mold and mildew, which are often mistaken for dirt, look for small, sometimes fuzzy spots that are gray or black and don't wash off with water. You can perform a simple bleach test to confirm:
- Soak a rag with bleach
- Hold it on the suspected area for a few moments (don't scrub)
- If the spots disappear when you remove the rag, you're dealing with mold or mildew
It's important to address mold and mildew immediately to prevent wood rot. A product like Cabot wood cleaner can effectively remove these stains.
Fix Structural Issues
If you notice any issues with the structural integrity of your deck, such as wobbly or sagging sections, it's time to call in an expert. Problems caused by termites or extensive mold may require professional attention.
For less severe issues, you can make repairs yourself:
- Tighten loose railings and secure any detached components
- Replace missing or corroded metal connectors
- Hammer down any protruding nails or replace them with deck screws
If you're dealing with peeling paint or stain, you'll need to remove it before applying a new coat. Use a scraper and sandpaper to remove the loose material until you reach solid wood. For less obvious cases, you can perform a tape test:
- Place a piece of duct tape on the wood surface
- Press down firmly
- Quickly pull it off
- If you see stain, wood, or paint on the tape, the coating should be removed
Replace Rotted Wood
Boards that are cracked, broken, or damaged by rot need to be replaced. Here's how:
- Use a hammer and pry bar to carefully remove nails and damaged planks
- Be cautious not to harm adjacent planks in the process
- Cut new planks to fit using a circular saw
- Place the new board and screw it into the joist
For new wood, be aware that it may have mill glaze or an active sealer present, which can repel stains. A light sanding can reopen the grain, allowing stain to penetrate. If you're working with freshly treated lumber, you'll need to wait until the treatment wears down and the lumber dries out.
To test if new wood is ready for staining, perform a simple water test:
- Pour some water on the wood
- If the water beads up, you may have mill glaze or the wood is still too wet
- Test treated lumber every few months until the water penetrates the surface
By thoroughly inspecting and repairing your deck, you're setting a solid foundation for the staining process, ensuring a beautiful and long-lasting finish.
Deep Clean the Deck
To prep your deck for staining, you need to give it a thorough cleaning. This process involves removing the old finish, applying a deck cleaner, and rinsing thoroughly. Let's break down each step to ensure your deck is perfectly prepped for its new coat of stain.
Remove Old Finish
Before you can apply a fresh coat of stain, it's crucial to strip off the old finish. This step ensures better adhesion and a more durable bond for your new stain. Here's how to do it:
- Prep your deck by removing all furniture and obstacles to access the entire surface.
- Use a paint scraper to remove as much of the old finish as possible. This is also a good time to reset any protruding nails or screws.
- Apply a deck stain remover using a roller or pump-style garden sprayer. Work in small sections, covering 20 to 30 square feet at a time.
- Allow the stripper to sit for 15 to 30 minutes, keeping the wood wet until the finish softens.
- Scrub the softened finish off using a stiff brush.
- For tough spots or heavily discolored areas, use a coarse stripping pad on a grinder or drill.
Apply Deck Cleaner
Once you've removed the old finish, it's time to clean the deck thoroughly. This step helps lift dirt and contaminants from the wood, ensuring better stain penetration and a uniform finish.
- Choose an appropriate deck cleaner that is suitable for deep cleaning various surfaces, including wood, concrete, and composites. These types of cleaners effectively remove stains caused by mildew, dirt, algae, and mold.
- If you're working with previously stained wood, dark cedar, or redwood, consider using Cabot Deck Brightener & Wash, which is gentler on these surfaces.
- Apply the cleaner at full strength using a pump-style garden sprayer.
- Allow the cleaner to sit for 5 to 10 minutes. While scrubbing isn't typically required, you may need to scrub tough stains or algae-affected areas.
Rinse Thoroughly
The final step in the deep cleaning process is to rinse your deck thoroughly. This ensures all cleaning products are removed, allowing for optimal stain absorption.
- Use a garden hose or pressure washer to rinse the deck completely.
- Make sure to remove all traces of the cleaner, as any residue may interfere with stain penetration.
- If necessary, apply a second round of cleaner for stubborn stains or heavily soiled areas.
- After rinsing, allow the deck to dry completely for at least 24 hours.
- Once dry, lightly sand the surface with 120 to 150 grit sandpaper. This exposes a fresh, durable surface ready to accept the stain.
- Sand in the direction of the wood grain and remove all sanding dust before applying the stain.
By following these steps, you'll ensure your deck is thoroughly cleaned and prepped for staining. This process not only improves the appearance of your deck but also extends the life of your new stain, giving you a beautiful, long-lasting finish.
Prepare the Wood Surface
After cleaning your deck thoroughly, it's time to prepare the wood surface for staining. This crucial step ensures that your deck will absorb the stain evenly and look its best for years to come. Let's walk through the essential processes of sanding, applying wood brightener, and allowing your deck to dry properly.
Sand Rough Areas
Sanding your deck is an important step to create a smooth surface for staining. Here's what you need to know:
-
Choose the right sandpaper: For exterior wood, stick to 100 grit or lower. Using finer grits can close the wood cells, preventing proper stain penetration.
-
Use a palm sander: A palm sander with 80 grit sandpaper is ideal for most decks. It's gentle enough to avoid damage but effective in smoothing rough spots.
-
Focus on problem areas: Pay special attention to areas with splinters, rough patches, or stubborn stains.
-
Sand with the grain: Always sand in the direction of the wood grain to avoid creating cross-grain scratches.
-
Be cautious with soft woods: For cedar decks, start with 60 grit and work up to 100 grit to avoid fuzzing the wood.
Apply Wood Brightener
Wood brightener is a crucial product that not only enhances the appearance of your deck but also prepares it for staining. Here's how to use it effectively:
-
Choose a quality product: Look for a wood brightener containing oxalic acid, which is safe and effective.
-
Dilute the product: Mix 1 part wood brightener with 4 parts water in a plastic container.
-
Apply the solution: Use a sprayer, brush, or mop to apply the brightener to wet wood. Work in small sections of 20-30 square feet at a time.
-
Let it sit: Allow the solution to stand for 3-5 minutes, keeping the area wet with additional solution if needed.
-
Rinse thoroughly: Use a garden hose to rinse the deck and surrounding vegetation completely.
Allow Deck to Dry
Proper drying is essential before applying stain. Here's what you need to know:
-
Wait at least 48 hours: This is a general rule of thumb for a newly washed deck in sunny conditions.
-
Extend drying time for shaded areas: If your deck gets little sunlight, wait at least 72 hours before staining.
-
Use a moisture meter: For best results, ensure the wood's moisture content is 19% or less before staining.
-
Perform a water test: Pour a little water on the wood. If it's absorbed easily, the deck is ready for staining. If it beads up, wait longer.
-
Consider weather conditions: If rain is in the forecast, cover your deck with a tarp to keep it dry and ready for staining.
By following these steps to prepare your wood surface, you'll create the ideal foundation for a beautiful, long-lasting deck stain. Remember, proper preparation is key to achieving professional-looking results that will enhance your outdoor living space for years to come.
Conclusion
Prepping your deck for staining is a crucial step to ensure a beautiful and long-lasting finish. By following the steps outlined in this guide, you can transform your weathered deck into a stunning centerpiece of your outdoor living space. From gathering the necessary tools and materials to deep cleaning and preparing the wood surface, each step has an impact on the final result.
To wrap up, remember that patience and attention to detail are key to achieving professional-looking results. Taking the time to inspect, repair, clean, and prepare your deck properly will pay off in the form of a beautiful, well-protected outdoor area that you can enjoy for years to come. So, roll up your sleeves, grab your tools, and get ready to give your deck the makeover it deserves.
FAQs
-
What steps should be taken before staining a deck?
- Before staining your deck, it's crucial to clean and sand the wood surface. Starting with a clean surface ensures that the stain adheres properly and helps prevent peeling.
-
What is the most effective method to clean a deck prior to staining?
- The best approach to cleaning a deck before staining involves using a deck cleaner and brightener, followed by pressure washing. This method ensures thorough cleaning and prepares the wood for staining.
-
Is pressure washing alone sufficient to prepare a deck for staining?
- Simply pressure washing a deck is not enough to prepare it for staining. For optimal results and longer-lasting stain, it is advisable to first treat the deck with a quality cleaner and brightener before pressure washing.
-
Should I sand the deck or wash it before applying stain?
- It is advisable to first apply a light wood stripper and then pressure wash the deck, cleaning it board by board. This process cleans the surface and opens up the wood grain for better stain absorption. If the wood feels rough after washing, sanding is recommended once it has completely dried.